January 31, 2011

skirt flirt

I love skirts. Don’t you? It just so happens that I went to Anthropologie over the weekend and used my birthday giftcard to buy a special skirt! The Amhara Skirt was love at first sight. I knew I had to have it. And somehow my shapely behind fit into a size 8. 
It is a magical, happy, 2 pockets full of sunshine skirt.
And I love it.
I don’t have a better picture of myself wearing it, so the iphone magic will have to suffice!

January 30, 2011

Gingiber Giveaway Day at Smile and Wave

It is giveaway day on the lovely blog Smile and Wave! Hop on over there to enter to win my new print, “Mon Petit Chou Chou”.

Be back later today with a new Bathroom Facelift Post!

Stacie

January 28, 2011

this week’s etsy favorites – valentine’s day

1. Pair of Mini Valentines by owlyshadowpuppets, 2. Large Wooden Cake Stand by sundayhatch; 3. Franken Heart by markhed; 4. Shared by yousentimentalidiot

I have taken a month off from etsy favorites, but I am back with some of my favorite picks for the season!

January 27, 2011

what goes around comes around, and around

If you follow me on twitter, then you probably have noticed that every weekend someone in my family is sick! The illnesses of choice have been bronchitis and conjunctivitis. And this ring around-the-rosie of illnesses has got to stop!

Pictured above are ALL of miss Violet’s toys. We are wiping them down (again) with Clorox disinfectant wipes. We have washed every sheet and every article of clothing.

So moms reading this, please tell me, what can I do to make the sick go away? Violet goes to daycare, so should I simply accept that being sick non-stop is inevitable?

Blargh. It is hard to keep up with all of the runny noses that need to be wiped and pink eye drops that need to be applied. Yet I am hoping that once this winter weather goes away, we will all be as good as new!

Stacie

January 26, 2011

like mother like daughter

I don’t know about other moms, but I spend a lot of time looking at my sweet daughter’s little face. I want to memorize every precious feature, every dimple, because with every passing day, she changes. She is growing up. She is picking out her own clothes (she now prefers purple shirts to pink shirts). She is cleaning up her room. She is no longer a baby, but a caring little girl. And I adore her.

And sometimes, I see a lot of myself in her! Both in the way she looks and in her personality!

This is a picture of me when I was 2 (note the lovely bowl haircut).

Here are 2 pictures of miss Violet. I am sure I could hunt down a better picture to show the resemblance, but these get the job done!

Do you see the resemblance? Blonde hair. Check. Blue eyes. Check. Mouth hanging wide open like a cod fish? Just like me! We have the same shaped mouth. Same chin. Little things, but sometimes I see her looking up at me, and it shocks me to think that she resembles me to!

She definitely has some traits from her daddy too (her face is much more round than mine was, and she has his nose (thank GOD!). She has his long toes and big eyes. But she is kinda a Stacie clone!

Violet also takes after me in some other areas. She is kinda a ham. Doesn’t mind being a little goofy. She is EXTREMELY strong willed, just like me! She is a bit of a control freak. I suppose she gets that from me, as her dad is the most easy going person on the planet! She is so affectionate, I can hardly keep up with her! She loves to draw (and I know all kiddos like to draw, but I like to think that this is a foreshadowing of creative things to come from Violet).

Sometimes, when I think about my little family of 3, I think that life could not get any better. It gives me such joy to see little pieces of myself in my daughter. It makes me want to live a better life. Be a better person. Then maybe someday she won’t mind that she looks a little bit like her momma.

January 23, 2011

the bathroom facelift: progress

Hello! I took last Sunday off, as my mother came into town. We spent the day playing with the kiddo and drinking unhealthy amounts of coffee!

However, lots and lots of progress has been made on the bathroom.

I need to tape and paint the top of the walls (everyone hates that part of the paint job, right? We are also thinking about putting a light above the toilet, as this corner tends to get really dark.

We had leftover hinges from when we renovated our kitchen last year, so it was an easy fix!

 Before

During (pardon our clutter)

After! Check out those lovely cabinets! They look good as new!

Our new handles are really nice (not the Anthropologie one’s I wanted earlier) and were only $2.70 (ish) each! They have nice clean lines, and don’t stick out too far from the cabinets, which is nice in a small bathroom.

We are nearing the finish line, folks! I am going to really put my bargain pants on, as my dog, Schroeder, got terribly sick this week, and I used the cash I had saved up for the bathroom to pay for his vet visit.

Just so you know, Schroeder had a series of cluster seizures that lasted 12 hours on and off. He is stabilized now, but can no longer walk in a straight line and seems really out of it. He goes back to the vet for a checkup next week, but it is terribly sad, as he is only 3 years old! I am praying that the new medicine he is on is responsible for the change in behavior. Say a little prayer for my puppy, if you feel so inclined.

Next week I will give you the cost breakdown of what we have spent so far, and what is left to do!

-Stacie

But I like a good challenge!

January 22, 2011

how’s it hanging?

I’ve got a bit of a decorating situation: what to hang above my couch? Ever since we got our new couch cover (which Wallace and I both ADORE, can’t you tell?) my painted sea green mirror no longer meshes. I’ve got great plans for this mirror (it will look divine  above my dining room table). But as it is, I am stuck trying to figure out a solution for what to replace it with! With the help of Photoshop, I’ve narrowed down some alternatives:

Option 1: Picture Grouping

Photoshopped image source: younghouselove

 This option would allow me to use a lot of existing prints that I have around the house. I can hit up the salvation army for inexpensive frames, and paint them all the same color for a nice cohesive effect. I love the way that Sherry and John from Young House Love pulled this off in their daughter’s nursery.

I just don’t want too much clutter, ya know? Is the scale large enough? Moving onto option #2:

Option 2: Record Frames as Art

Photoshopped image source: Urban Outfitters

This is another inexpensive alternative. These frames are from Urban Outfitters, and are 2 for $15 (score!). I could put fabric inside of them, original art, large colorful photographs to pull in the colors from the rest of the room, who knows!

Yet do they fill the space well enough? I know that I did not scale these to size, so I believe that they will be much smaller in real life. Onto Option #3:


Option 3: Affordable Suzani Textile (In My Dreams)

Photoshopped image source: cloth and kind

I have a wonderful, reoccurring dream: I go to a local antique store, rummage through an old barrel filled with yellowed sheets and scraps of fabric, and suddenly find a GORGEOUS Suzani textile for $15! Of course this is only a dream. And real suzani costs an arm and a leg.

But if I could afford Suzani, I would want it to be as close to the one Photoshopped above my couch. I love the deep fuchsia’s and oranges! Of course this Suzani is over 100 years old and belongs to someone else, but I can still close my eyes and dream. Finally Option #4


Option 4: 6 Square Frames from IKEA

Photoshopped image source: Apartment Therapy
This option is a lot like the second image, a large grouping of images. Yet I like 6 frames all painted white. It is balanced. But is it boring? I would definitely use colorful images inside these frames. Pops of pinks and greens! Still, 6 frames can add up in the old $$ department. 
Maybe I could build some frames out of canvas stretcher bars?
So what do you guys think? I need your input! I am leaning towards option #4, but am still torn!
Happy Saturday!
Stacie

January 21, 2011

friday find: pucci by sandrasuy

Don’t you simply adore this exquisite print from SandraSuy? I adore the pattern (triangles are very in right now, no?) and the glamorous fashion drawing. It makes me want to strike a pose (or at least comb my hair).
Have a pretty pretty weekend!
Stacie

January 20, 2011

i spy: papernstitch valentine giftguide

You know the old song, “All You Need Is Love”? Well if that is the case, papernstitch has put together an AMAZING Valentine’s Day Gift Guide sure to help you fulfill your love quota for the year!
So if you need some help finding that perfect gift for Valentine’s Day, be sure to click here to see a great collection of love themed art from some of my very favorite handmade artists!

January 19, 2011

Customizing my blogger blog

Hi! As you may have noticed (or maybe you haven’t clicked on my blog in a while if you read my blog in a reader) but the GingiberSnap blog has been getting a wee bit fancy, and I thought that I would share with you some great resources and tutorials that have been quite helpful during this transformation! Maybe you will decide to try out a tutorial or two on your own blog! Here are some of my favorite new elements on the blog:

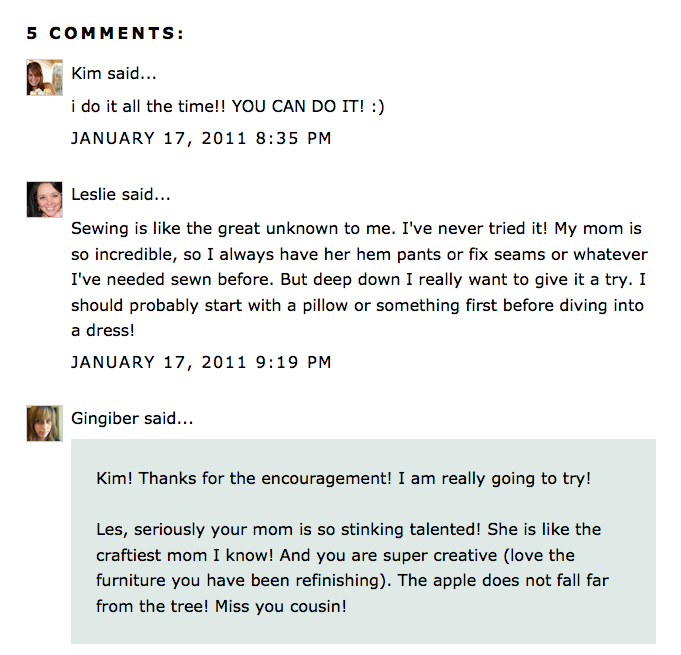
1. Comment Quote Bubble 

I used this great tutorial over at BloggerStop to learn how to add my own customized comment quote bubble in my blog post title header. They give extremely clear step by step directions on how to go into your blogger design, select the HTML code, and add 2 sections of code in order to achieve a custom comment bubble. I designed my own custom thought bubble using Adobe Illustrator and used it instead of the stock thought bubbles that are available at BloggerStop.

I think the greatest advantage of having a comment bubble at the top of each blog post is that it encourages readers to leave a comment if they see that other people have already left a comment. As the comment bubble is in the Post Title, people may decide to keep on reading just because they see the number of comments first thing (Just a theory, but ever since I added this element, my comments have increased a wee bit!).

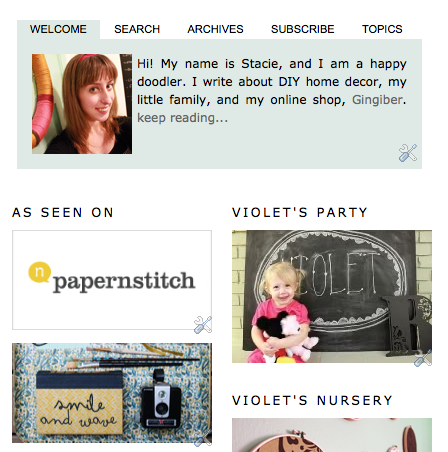
2. Highlight Author Comments

Have you ever left a comment on someone’s blog, and then check back periodically to see if the blog author has responded yet? Maybe it is just me, but I am always anxious to see what the author has to say in the comments section. Using the Highlight Author Comments tutorial from BloggerBuster, I learned how to customize my HTML code so that anytime I reply to a reader’s comment, it is has a blue box surrounding it! I really love this element! And I color coordinated it with my custom thought bubble! 5 points for color coding!

This is a simple, clean design element that adds a bit of professional touch to any blog. And it makes having a conversation within a blog post a heck of a lot easier to keep track of!

3. Adding a Stacked Sidebar on top of 2 Smaller Sidebars

I have seen a lot of blogs using what appears to be a large sidebar on top of 2 sidebars. This can be useful if you plan on displaying advertisements, blog buttons, or other page elements, such as blog archives or a tabbed navigation sidebar box (the latter which I will explain soon). I followed this quick and easy tutorial from Things We Love to Hate.

This tutorial is AMAZING because it shows you how to go from having a single sidebar, to a double side bar, to having 3 sidebars! It also is helpful in explaining the some simple HTML words, like margins, padding, width attribute, etc. 


4. Adding a Multi Tabbed Widget for Blogger Sidebar

 One of my biggest struggle with blog design is keeping things clean and organized visually. I tend to want to add too many elements, thus making it hard for readers to navigate! So I have long been a fan of the Multi Tabbed Widget that I have seen on many WordPress blogs. This element comes built in to certain WordPress templates, but alas, Blogger has not yet integrated this widget into their blog layout options.

So I began searching for tutorials, and settled on this Advanced Multi Tabbed Widget Tutorial from My Blogger Tricks.

Please note that this tutorial involves a bit of JavaScript (something I am not all that familiar with) but it is explained beautifully! This widget allows you to to put widgets that would normally be located on your sidebar, such as archives (which normally take up loads of space) topics, blog search, etc. and place them in an organized box. When you click on each tab, the size of that particular tab changes in height depending on the amount of content.

This is quite possibly my favorite new blogger element! I think that for a reader, most of the pertinent information about the blog is front and center.

So there you have it! Do you dabble in blog design? What are your favorite blogger tips and tricks? Please let me know what you think of this list, and share your favorite blogger hacks as well!